
Email is one of the most widely used forms of communication, with half the world’s population expected to be using email by 2022. While it’s fast and convenient, it comes with its downsides, a big one being that it isn’t very private. Mainstream email providers generally don’t offer email encryption as an option. This means your information is at risk of being exposed to malicious parties such as hackers and other snoopers.
While most providers don’t offer encryption, some do. Services like Hushmail and ProtonMail will encrypt emails such that they can only be read by the intended recipient. These aren’t perfect either, and pose issues with accessibility, for example, when the recipient isn’t a fellow user of the service.
If you’d prefer to stick with an existing provider, there is the option to add encryption to many popular email platforms such as Outlook and Gmail. This can be a bit complex but may be worth it to keep using your regular service.
In this guide, I’ll explain more about the need for encrypting email and show you how to use email encryption with your existing email service. I’ll also give you several options for secure email service providers.
Contents [hide]
- Why you need email encryption
- Encrypting emails sent from your existing email client
- Types of email encryption
- Obtaining a digital certificate for S/MIME
- How to encrypt Outlook emails
- How to encrypt iOS (and MacOS) emails
- Encrypting Android email with S/MIME
- Encrypting webmail (Gmail example) with PGP/MIME
- Using a secure alternative email service
- Hiding your email address
Why you need email encryption
Most popular email providers typically use the TLS or TCP/IP protocol for data transmission. These encrypt data while in transit between email servers. However, once the email reaches the recipient’s server, it is no longer encrypted. It resides on the server in plain text so anyone who gains access can read its contents.
Additionally, when someone sends you an email, there’s no guarantee they are using an email provider that uses TLS. Both the sender and receiver need to use TLS for the message to be encrypted in transit. If not, and the email is intercepted, it could be read, altered, or deleted by a malicious party.
Some providers such as Gmail enable you to configure your email client such that a secure connection is required for emails to be sent or received. However, this means that outgoing mail sent to a recipient with a non-TLS connection will bounce. Similarly, incoming mail sent from someone who isn’t using TLS will be rejected by your client. You only get a notification in the first scenario while the sender will receive a notice in the latter case.
Adding encryption to emails encrypts the email while in transit and at rest. If intercepted or accessed while residing on a server, it will be unreadable to anyone without the recipient’s private key.
Encrypting emails sent from your existing email client
As mentioned, most mainstream email providers do not offer encryption as an option. It is possible to encrypt emails you send from your existing email client yourself, but bear in mind, it’s not exactly simple. Before diving into the options and steps, it’s important to know how email encryption generally works.
When you encrypt an email, you’re scrambling the contents such they are unreadable by anyone without the decryption key.
Encrypted email uses public key cryptography, where each user has a set of two keys — one public and one private. The public key can be discovered by anyone as it’s stored on a key server with your name and email address. The private key is stored by the user and should not be shared with anyone else.
When you send an encrypted email, you scramble it with the recipient’s public key, although the public key cannot be used to decrypt it. Once encrypted, only the recipient’s private key can be used to decrypt the contents.
Types of email encryption
There are two main types of email encryption: S/MIME and PGP/MIME. Neither are particularly straightforward to set up but some operating systems are more straightforward to use with one versus the other.
- S/MIME: This is the type built into MacOS and iOS devices, as well as Outlook products. Emails sent from devices using these platforms contain an attachment that verifies the recipient’s identity. With S/MIME, a centralized authority selects the key size and encryption algorithm. This type of encryption is easy to maintain, but it’s a bit trickier to set up with web-based email clients. S/MIME certificates come with a fee, although this may be included in some products such as Microsoft Outlook.
- PGP/MIME: This type of encryption gives you more flexibility than S/MIME as you can choose not only how you encrypt the emails you’re sending, but also how well you want the emails you receive to be encrypted. It works based on a decentralized model and is simpler to set up if you’re using web-based email. Plus, a certificate is free.
Below, I’ll cover steps for encrypting various email clients with S/MIME or PGP/MIME, whichever is the most straightforward for each case.
Obtaining a digital certificate for S/MIME
In most cases, the most straightforward type of encryption to set up is S/MIME. To be able to send encrypted messages via this method, there are a few prerequisites:
- You need a digital certificate. A digital certificate enables a user to send a digital signature that provides verification of the sender’s identity. I’ll discuss how to get one below.
- The recipient needs a digital certificate too.
- You need to have received an email from the recipient with their digital signature to be able to send them an encrypted email.
As such, when following an S/MIME encryption process, you’ll need to have your own digital certificate issued by a certificate authority. In this section, I describe the steps for obtaining and saving a digital certificate for use with the Outlook, iOS, and Android instructions below.
Note that if you already have a digital certificate file saved on your computer or device, you can skip this section.
1. Obtain your digital certificate
If you don’t already have an email certificate, you can buy one from a certificate authority. In this example, I’ll use a free trial of Sectigo’s (formerly Comodo) digital email certificate which lasts 30 days. For a one-year certificate, the cost is $19.99.
Note, you’ll need to use a web browser to obtain your certificate. Some browsers won’t support this process so you may have to switch. I used Firefox, which worked fine with no settings changes. Internet Explorer is another popular option. Installation through Chrome is not supported.
- Go to Sectigo’s Secure Email Solutions page, scroll down to the pricing table, and select which version you would like.
- In the resulting screen, enter your name, email address, and revocation password. The latter will enable you to revoke your certificate if you believe its security has been compromised.
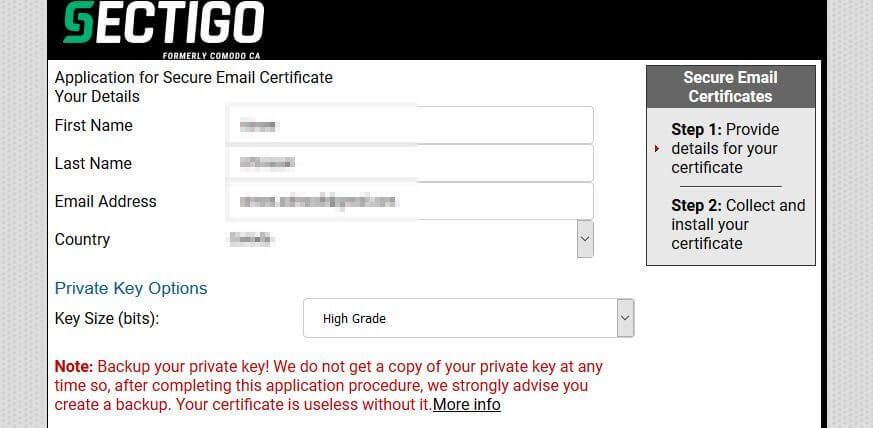
- If all goes well, you will get a popup message confirming that your application was successful.

- You’ll receive an email with a link to collect and install your digital signature. Click the link (it should appear as a red button with the text “Click & Install Comodo Email Certificate”) and your certificate should automatically install in the browser you’re using.
- You should now see a popup telling you your certificate has been installed.

2. Back up the certificate file
Next you need to back up the certificate by saving the file to your computer. This ensures you have a secure copy and can use it on different browsers and devices. The process of backing up will depend on the browser. I’m using Firefox but you can find instructions for Internet Explorer, too.
- In Firefox, go to the hamburger menu icon in the top right-hand corner of the screen.
- Go to Options > Privacy & Security, scroll to the bottom of the page, and click View Certificates.

- Go to the Your Certificates tab. Your new certificate should be on the list.

- Select it and hit Backup… (or Backup All… if it’s the only certificate).
- You can now save the file on your computer in a location of your choice. Upon choosing a location in which to save the file, you’ll be prompted to enter and re-enter a password.

- Once you’ve done that, hit OK.
- Now your file is saved and you can transfer it to other devices.
Note: For Windows users, if you click on the saved file in its new location, you’ll be asked to use the ‘Certificate Import Wizard’ to transfer your certificate to a Certificate Store.
How to encrypt Outlook emails
Outlook is arguably the easiest platform when it comes to encrypting emails. Here are the steps:
1. Get your ID into Outlook
- In Outlook, go to File > Options > Trust Center > Trust Center Settings > Email Security and click Import/Export.

- Select Browse…, find your certificate, and hit Open.
- You’ll be prompted to enter the password that you used when you created the certificate.
- Once you hit OK, your certificate will be imported.
2. Configure your certificate with Outlook
- Go to File > Options > Trust Center > Trust Center Settings… > Email Security > Settings.
- Choose a name for the Security Settings Name field.

- Click Choose… next to Signing Certificate, select your certificate, and hit OK.
- Do the same for Encryption Certificate.
- Check Add digital signature to outgoing messages.
- If you want all messages to be encrypted by default, you can also check Encrypt contents and attachments for outgoing messages.

3. Send encrypted email
- Select New Email to open up a composition window.
- Depending on your settings in the previous step, you may need to adjust settings to sign and encrypt emails. Click Options and use the options Sign and Encrypt to sign and encrypt your message.
Note that as mentioned, you can only send someone an encrypted email if they have sent you at least one email in the past with their digital signature attached. Similarly, you can only receive an encrypted email from a recipient if you have already sent them at least one email with your digital signature attached.
How to encrypt iOS (and MacOS) emails
The process for MacOS and iOS are similar so once you have you certificate, it should be straightforward to use both. I’ll detail the process for iOS here. The main difference with MacOS is that you won’t necessarily have to send your digital certificate to yourself. If you already have your digital signature stored on your device, you can skip the first step.
1. Transfer your certificate to your iOS device
You should have your digital certificate saved on your computer using the steps outlined earlier. You can send it to yourself in an email. Alternatively, you can use a USB device or upload the certificate to secure cloud storage. I’m using email on an iPad but an iPhone should be similar.
- Send yourself an email with the certificate attached.
- On your iOS device, open the email and click the attachment. You will be prompted to allow a configuration profile to be downloaded. Click Allow.
- You should get a notification that the profile has been downloaded, on which you can click Close.
- Now go to Settings > General > Profile and you’ll see your new profile labeled ‘Identity Certificate.’

- Select this certificate and click Install in the upper right-hand corner of the screen.

- The next screen will say “The profile is not signed.” Again, click Install in the upper right-hand corner of the screen.
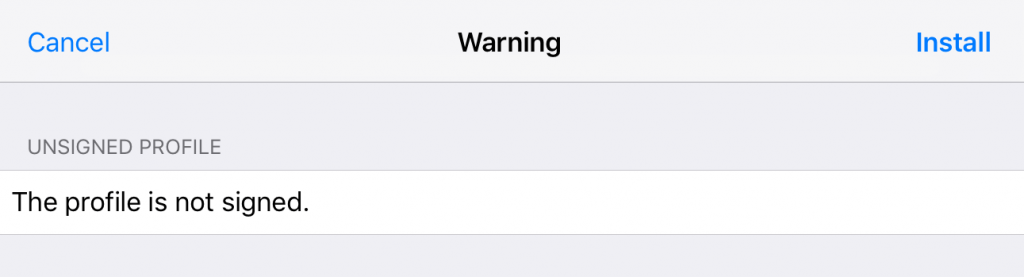
- You’ll be prompted to enter your passcode for your device. Enter it now.
- You may end up back at the same “The profile is not signed” screen. Just click Install again. You should get an Install Profile popup. Click Install.
- Now, enter the password you used when you created the certificate.

- In the resulting screen, click Done.
- The profile should now be labeled with the email address associated with your digital certificate.
2. Enable digital signing and encryption
iOS devices come with S/MIME built in but you need to enable digital signing and encryption in order for it to work.
- Go to Settings > Passwords & Accounts and select your email account in the ACCOUNTS section.
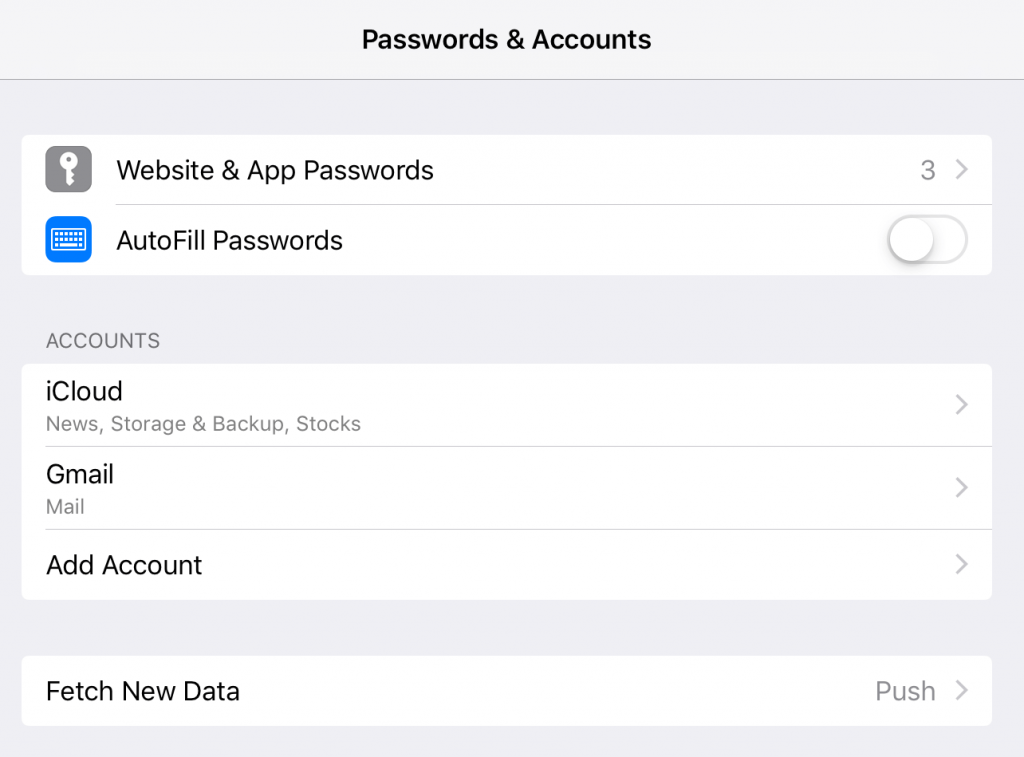
- Hit your account name.

- Select Advanced at the bottom of the screen.

- Scroll down to the S/MIME section and select Sign.

- Your certificate that you installed earlier should be listed in this screen. Switch the toggle to the on (green) position.

- Go back to the Advanced screen and in the S/MIME section, select Encrypt by Default.
- Switch the toggle to the on position here too.
Note: There may be instances where you need to send someone a digitally signed message without encryption, for example, if they need your signature in order to send you an encrypted message for the first time. In this case, you can leave Sign on but turn Encrypt by Default off to send the email.
3. Add recipients to your keychain (if you haven’t already)
Before you can send someone an email, you need to have received at least one email from them with their digital signature.
- When you receive that email, look at the sender’s address. If you already have their certificate installed, you’ll see a blue checkmark. In this case, you can move on to the next step.
- If you don’t have their certificate installed, you’ll see a red question mark to indicate the signature is untrusted. In this case, click the sender’s address and in the resulting popup, hit View Certificate.
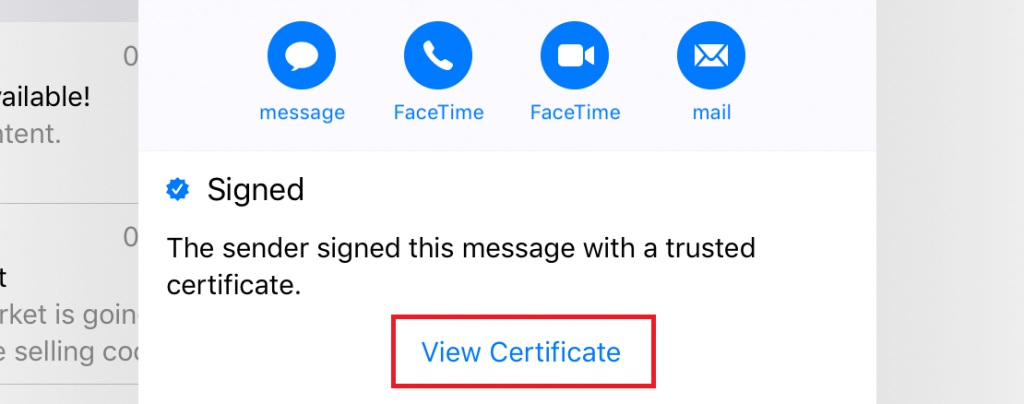
- Select Install.

- The Install button should change to red and say “Remove.” Hit Done in the top right hand corner.
- The certificate will now be stored on your device and you will be able to send encrypted emails to that recipient.
4. Start sending encrypted emails
- On your iOS device, open the Mail app. If you have multiple accounts, select the one that is associated with your digital signature.
- Start composing a message. In the To: field of the composing window, you should see a blue padlock symbol.

- Enter the email address of the person you wish to send an email to. You should see a blue padlock next to any person’s name whose digital certificate you have installed.
- If you see a red symbol, you don’t have their signature installed or their certificate has expired.
Encrypting Android email with S/MIME
Android users can opt for S/MIME or PGP/MIME encryption with not too much difficulty. For S/MIME, I recommend an app called CipherMail. For PGP/MIME, you can implement OpenPGP with the Open Keychain app. The one major benefit of PGP is that you don’t need to trade certificates with recipients before sending encrypted mail. However, since the S/MIME option is a bit simpler, I’ll be showing you how to use CipherMail here. If you’re set on PGP, you can find instructions here.
CipherMail can be used with Gmail as well as other Android email apps, such as K9. Note that CipherMail will install a certificate for you when you’re getting set up. However, this is a “self-signed” certificate and is not validated by a certificate authority. As such, CipherMail recommends that you purchase and install your own certificate either before or after initial setup. Here are the steps to use CipherMail (note that you’ll need to refer to some of the steps under iOS above for obtaining a certificate).
1. Add your certificate to your device
- Send your digital certificate to your device by sending it via email or using a USB or a cloud service. It’s best to do this before setting up CipherMail as the CipherMail setup wizard can automatically pull your certificate from your device.
- When you open up the email attachment, choose to open it with Certificate Installer.
- Next, you’ll be prompted to enter the password you set up when you created the certificate. Enter it and click OK.

- You’ll be asked to name the certificate and can then click OK.
3. Install and configure the CipherMail app
- Download and install the CipherMail app from the Google Play Store.
- Open CipherMail and go through the configuration wizard. On step 2, ensure that your email address is the one that your digital certificate is associated with.
- I’m using Gmail, for which CipherMail automatically configures SMTP settings, so I hit NEXT… on step 3. If you’re using a different SMTP server, select MANUAL SETUP… and refer here for instructions for manually setting up your server.
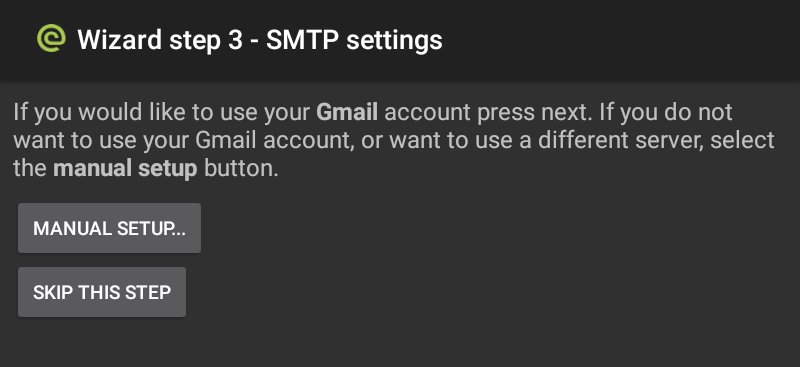
- Step 4 gives you the option to create a self-signed certificate, which you shouldn’t need if you’ve already purchased a validated certificate from a certificate authority. If you have a certificate, you can hit SKIP THIS STEP.

- Step 5 enables CipherMail access to the certificate you installed on the device earlier. Click NEXT….
- Step 6 should tell you that the wizard has finished. Don’t worry if you made a mistake; the wizard can be rerun at any time.
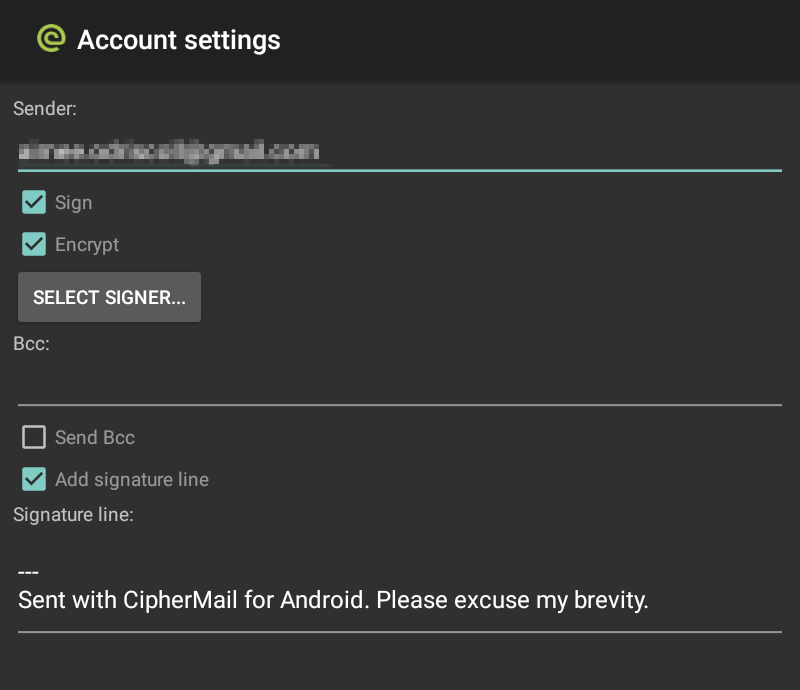
- Now in the main screen of the app, go to Settings > Account > SELECT SIGNER… You should see your digital certificate. Click on it and exit the screen.
3. Install the recipient’s certificate
You need to have the recipient send you an email with their signature before you can send them an encrypted message.
- When they send you the email, click the signature attachment and select Import Certificates.

- You will be prompted to enter the password for the key store that you set up earlier and the keys will be imported.

4. Allow access to less secure apps (for Gmail)
If you’re using Gmail, you won’t be able to send any emails using CipherMail until you make a small adjustment to your security settings. CipherMail needs access to your Gmail account, but the app is not deemed secure by Google, so Google will automatically block access when you try to send an email.
- To turn on access to less secure apps, go to your Google Accounts page and select Security from the left menu.
- Go to the Less secure app access section. Click Turn on access (not recommended) and toggle the switch to the on (blue) position.

5. Compose your message
Now you are ready to select Compose Message from the main CipherMail app screen and start sending your message. You can choose recipients, add attachments, and select whether the message should be digitally signed and encrypted.

Encrypting webmail (Gmail example) with PGP/MIME
Incorporating S/MIME is complex and likely not something the average user wants to undertake. Thankfully, a simple method exists to encrypt emails within a web-based client such as Gmail. PGP/MIME can be incorporated using a browser extension. I’ll show you how to use a Chrome extension called Mailvelope (there’s also a version for Firefox), but other similar options include FlowCrypt, EnigMail, and GNU Privacy Guard. These take a little while to set up, but are very easy to use once you get started.
Mailvelope integrates into the webmail client interface with unobtrusive elements and comes pre-configured to work with Gmail, Yahoo Mail, Outlook, among others. Note that although Mailvelope will encrypt the contents of your email, it won’t encrypt attachments.
Here are the steps:
1. Generate a key
- Install the Mailvelope Chrome extension.
- Click the Mailvelope icon in the upper right hand corner of your browser and select the settings (gear) icon.
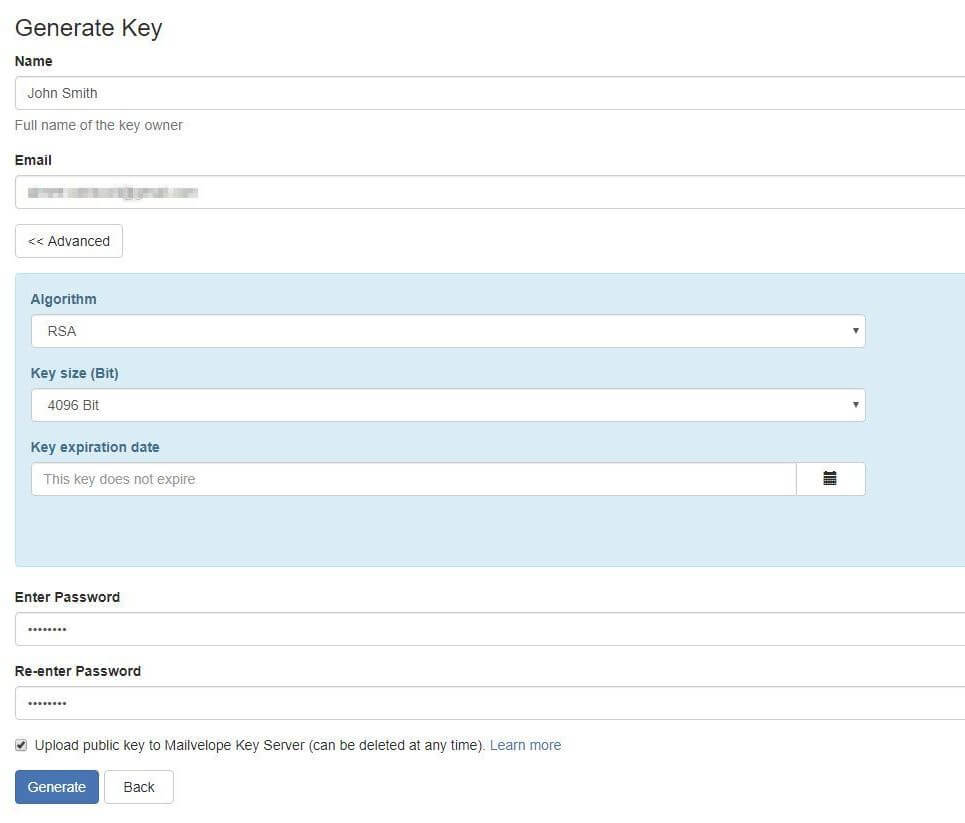
- If you already have a key, select Import Key and follow the instructions to search for a public, import a key from a file, or import a key as text. If you don’t have a key, select Generate Key.
- Enter your name, email address, and password. Note that there are advanced options available by clicking the Advanced button, including changing the algorithm and key size, and setting an expiry date for the key.
- The Upload public key to Mailvelope Key Server box is checked by default so you can decide if you want to keep this checked. This means your key is automatically made public on the Mailvelope Key Server. I’ll show you below how to upload it to other servers too.
- When ready, select Generate and you’ve got your key.
- You will receive an email requesting that you verify your key. This is an encrypted message so you’ll need to enter your password to be able read it.

- Once open, you’ll just need to click a link to verify your email address.
2. Upload your key
It is possible to share your key with others directly, but if you want people to be able to find it themselves, you’ll want it uploaded to a popular keyserver. You can simply use the option to upload it to the Mailvelope server, but some users might not find it there. The largest and “go-to” keyserver is MIT’s. Plus, it’s free and easy to use.
- In Mailvelope, go to the Key Management tab and select the key you just generated.
- Select Export and make sure Public is selected in the top right corner of the resulting popup (it should be by default). You don’t want to export your private key by mistake.

- Select Copy to clipboard.
- Navigate to the MIT PGP Public Key Server and paste your public key in the Submit a key box.
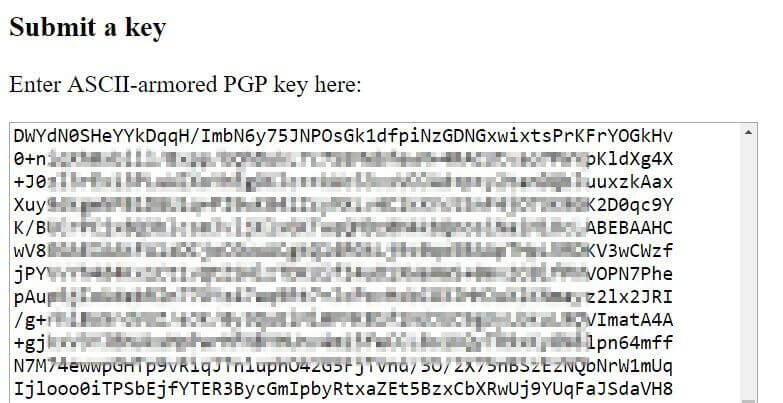
- Click Submit the key to the keyserver!
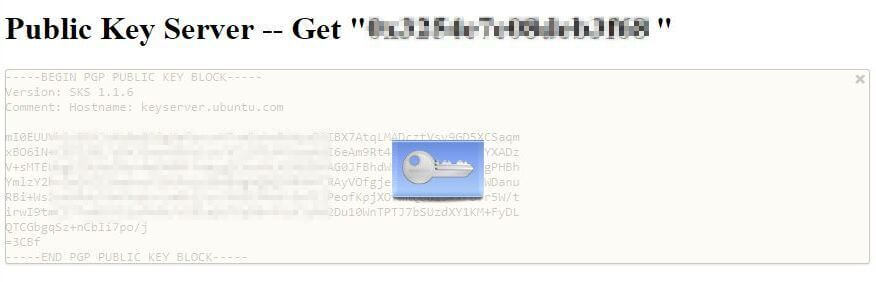
- Your key is now added. You can check by searching your name on the MIT keyserver homepage.
- Make a note of your key ID in case someone has the same name as you.
3. Get the recipient’s key
- In Mailvelope, go to the Key Management tab and select Import.
- Entering the recipients, name, email, or key ID, and hit Search. Note there are several option for which keyserver to search, so if you don’t see your recipient, you can try changing the keyserver.
- From the search results, select the key ID of the correct recipient.
- In the resulting screen, click the blue key icon. The key will be imported to your Mailvelope keyring.
- An alternative to searching for the recipient’s key is to enter the key text manually from a text file or by pasting is as text in the Import Keys window.
4. Start using encrypted email
- Within the Chrome browser, go to your Gmail client and select Compose.
- You’ll see a discreet pen and paper icon on the right side of the message composition window. Click this button to be taken to the encrypted message composer.

- Compose your email, add a recipient, and select Encrypt. Your encrypted message will then be ported to the body of a regular email. You can add additional unencrypted text and attachments if you’d like.
- All that’s left is to hit Send!
Using a secure alternative email service
A secure email service can offer a very simple and convenient way to send encrypted emails. The main caveat is that the recipient either has to be using the service themselves or be willing to head to a webpage (outside of their own email client) to view and respond to your message.
The other major thing to note about encrypted email provider is that you’ll rarely find one that offers a free service. That being said, prices are pretty reasonable and worth the cost due to the privacy they provide.
Hushmail

Hushmail is a Canadian company and is one of the more well-known secure email providers out there. New users can move existing email to your Hushmail account and set up forwarding from an old email account.
Hushmail is easy to use and you can simply add encryption by checking a box. If the recipient uses Hushmail, the box will be checked automatically. If the user doesn’t have Hushmail, you’ll have the option to check the box. In this case, the recipient will receive a link to a secure web page protected by a security question. They can reply to you within the Hushmail web interface.
The service uses multiple layers of security and is free from ads. A passphrase recovery feature is available on business accounts, but otherwise data recovery is unavailable. Hushmail works on web servers and with iOS, but there’s no Android app yet.
Hushmail Premium for personal use costs $49.98 per year and includes:
- 10 GB of storage
- Two secure web forms to place on your website
- Unlimited email aliases
- Dedicated customer support
Plans come with a generous 60-day money-back guarantee.
There’s also Hushmail for Small Business, which costs $6.99 per user per month which offers similar features to the personal plan as well as some additional, such as administrative tools. In addition, Hushmail offers plans tailored to specific industries, including healthcare (for HIPAA compliance), law, and nonprofits.
ProtonMail

ProtonMail is incorporated in Switzerland, a country known for its strong privacy protection laws. Similar to Hushmail, all emails between ProtonMail users are automatically encrypted.
If you send an email to someone who doesn’t have a ProtonMail account, they will be directed to read the email via a web page.
ProtonMail has a web version as well as Android and iOS apps. It uses open source cryptography and end-to-end encryption. A zero-access architecture means that user data isn’t accessible to the provider. This also means that data recovery is impossible, so don’t forget your password.
A Basic ProtonMail account is free and includes:
- 500MB of storage
- 150 messages per day
- Limited customer support
A Plus account costs €4 per month billed annually or €5 per month billed monthly and includes:
- 5 GB of storage
- 1,000 messages per day
- Labels, folders, and custom filters
- The option to send encrypted messages to external recipients
- The ability to use your own domain
- Up to five email aliases
- Priority customer support
Tutanota

Tutanota is one of the only top secure email providers that offers a free tier. While it’s limited, it is ad-free, unlike many similar free services. Tutanota works with a web browser or through apps for Windows, Linux, MacOS, iOS, Android, and Amazon Fire. Tutanota is open source, uses strong encryption, and supports two-factor authentication.
The free plan is intended for private use and includes:
- 1 GB of storage
- No option for custom domains
- Limited search
Premium pricing starts at €12 per month annually or €1.20 per month on a monthly basis. It doesn’t give you any additional storage but allows you to use custom domains, unlimited search, and up to five aliases.
A Pro version intended for businesses costs €6 per month or €60 per year, which offers 10 GB of storage and priority support, among other features.
Runbox

Runbox is based in Norway and has a novel selling point in that it is powered by renewable hydroelectricity. That aside, it’s a strong player in the secure email field using open source software to provide users with secure, reliable service. It works with PCs, Outlook, Mac Thunderbird, iOS, and allows you to transfer email from other services.
A Micro account costs $19.95 per year and includes:
- 1GB of email storage
- 100 MB of file storage
- One hosting domain
- Up to 100 aliases
Prices increase if you want more storage space and additional domains. Plans come with a 30-day free trial.
Mailbox.org

Mailbox.org is a German-based secure email provider offering low prices. This is another eco-friendly provider using energy-efficient data centers and powering offices with renewable energy. The ad-free service doesn’t track any user activity and offers a streamlined email experience. Features include discussion threads, a self-learning tabbed inbox, and push notifications.
Prices start at just €1, with the most basic plan (Secure Mail) including:
- 2 GB of mail storage
- 100 MB of cloud storage
- Up to three email aliases
- Mobile syncing
- Limited customer support
The Team Mail plan is €2.50 per user, ups mail storage to 5 GB, and provides you with additional group features. Plans come with a 30-day free trial.
Hiding your email address
Encrypting your existing email using the encryption methods described earlier will secure the actual contents of the email. However, some data is still visible such as the email addresses of the sender and recipient and the date and time of the email.
There may be some instances where you want this information to be hidden. As such, a burner email may be the best option. In this case, you get a temporary email address which can be used to receive mail. Some providers such as Guerilla Mail enable you to send mail from a burner email, including attachments. Zmail is another provider that allows you to send emails from a fake address, although you can’t receive emails with this service.
Note that with these burner email addresses, the content of the emails are not encrypted.
If you want the best of both worlds, you can use an alias email address from one of the providers I discussed earlier. Hushmail, ProtonMail, and others, give you multiple alias email addresses. When you use these, the new “alternative” email address will appear as the sender or recipient. In most cases, received emails will be automatically forwarded to your real email address.
Image credit: “Computer Laptop” by rawpixel licensed under CC BY 2.0